In this post, we are going to talk about Azure Functions. As known, Azure Functions are a PaaS, which stands for Platform as a Service. This allows us to develop or run a small piece of code that acts as a service on the cloud platform. This service can do several tasks like doing a certain job when an Http message from a Web API is received, or triggers another function when a certain action on the cloud platform takes place, or initiate an event when a new record inserted in Azure SQL or Cosmos, and so on. Today, we are going to create Azure Functions directly in the portal and later on we are going to use Visual Studio 2017 to create a certain function using .Net Core and reflect this function in the portal. In other coming articles, we will create an Azure Function App using VS Code, analyze an image using Azure Cognitive Services and save the results into either a SQL database or a Document inside Cosmos.
Since Azure Functions are also known as Serverless Computing Service that enables us to run code on demand without having to deal with the infrastructure, we will start by clearing up some terms that are being used like Serverless Architecture and PaaS. So here we go!
This post assumes that you already have an Azure account and ready to be used, in addition to Visual Studio 2017 installed on your machine. If not you can create your own free trial account by subscribing to Azure portal.
What is Serverless Architecture & PaaS?
By definition, Serverless Computing is defined as follow: Serverless Computing is a cloud-computing execution model in which the cloud provider runs the server, and dynamically manages the allocation of machine resources.
The first time I heard the term “Serverless” I paused for a while and thought, “How could this be possible, and how would we be able to run our apps without a server!” Nevertheless, it was not the case. We all need those special kind of powerful computers to run our applications, process data, and send information over networks. Therefore, the term Serverless Computing or what is also known as Serverless Architecture is somehow confusing or even more we could say it is an inaccurate naming or designation since a server is still required and it must be there to do all the required tasks. However, looking beyond the terminology is what matters now. When we say Serverless Computing, we mean that there is no need for us to care about server maintenance and the infrastructure because the server is out there in the public cloud datacenter. Our job shifts from maintaining the server to providing the proper and convenient instructions, which maintain the continuity of this server to do and perform the operations that are needed to be accomplished.
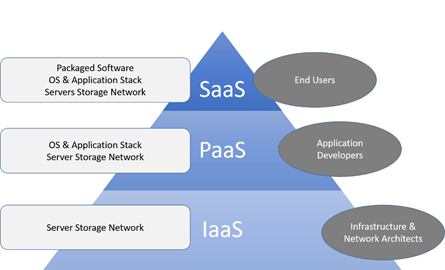
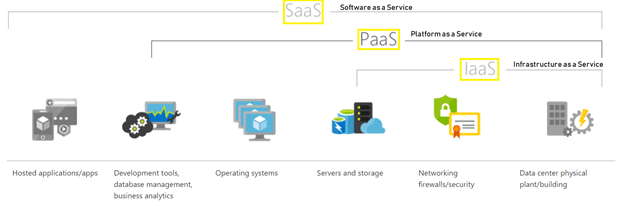
Serverless Computing is also about using Platform as a Service – PaaS technology. What do we mean by PaaS? The PaaS or what also known as aPaaS (Application Platform as a Service) is a complete development and deployment service provider category or environment in the cloud that allows customers to develop, run and manage their applications with resources that enable them to deliver everything needed without worrying about the maintenance of these resources. There are some other different concepts that we summarize in the figure below which are out of scope of this article, but we just need to know them if any to be mentioned later.
What is Azure Functions?
Azure Functions is a solution for creating functions in the Microsoft Azure cloud platform. The function is a small piece of code with some specific configuration that Azure needs in order to know when to call this function and what to do without worrying about the whole application or the infrastructure to run it.

The function in Azure is an efficient way to create a solution for the problem you have with a small code snippet, which leads to a more productive development. The function can be either an event driven or a trigger driven (or even respond to a webhook which is an HTTP API push request or a web callback like what GitHub generates when a code check in is performed for example) and it can be built using a variety of development languages like C#, F#, Node, Ruby and others.
Creating a Function App in Azure
A Function App in Azure in a way or another is a special type of App Service and to be more specific we can go further by saying that Functions in Azure are built on the top of App Services. So as in App Services where each service requires an app service plan, the function in azure requires what we call a Hosting Plan. Let us go systematically to create a function in azure.
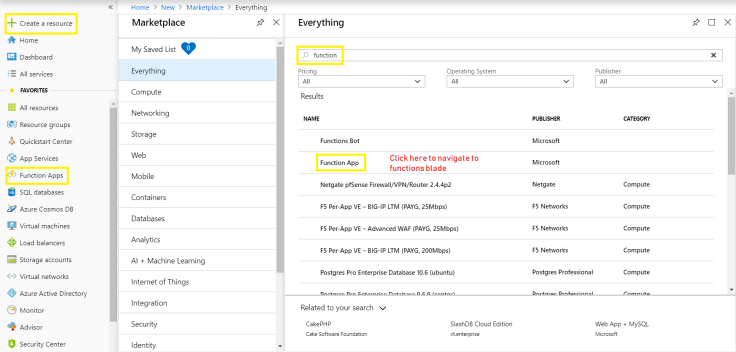
To create a function in azure, go to the Function Apps item in the left menu, or if it is not found click on “Create a resource” which opens a blade for searching the azure marketplace. In the search bar, write down the keyword function and here we go the results contain an item called Function App as shown in the figure below.
When clicking on Function App, a new blade will show up that contains little information about Function Apps and a “Create” button. Clicking on create button will lead to another blade as the one down below.
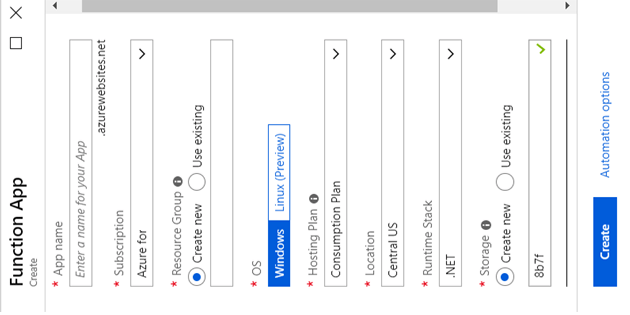
The mandatory fields are the one highlighted with a red asterisk and we will pass over them and explain each one.
The App name is the name of the function you want to create in azure and this name should be unique since it is combined with azurewebsites.net domain. The second field is the Subscription where you have to specify under which subscription you want this function to be created, knowing that azure gives you the ability to have several subscriptions (this can be managed and checked in the Subscription blade).
A resource group is a single logical entity, which groups all related resources together. We mean by resources storage accounts, virtual machines, virtual networks and many other resources that may be used by the service you are creating in Azure. Here, either you can select an existing resource group to append the resources to be created by the function to it, or you can create a new resource group that is only related to the function being created. Usually, I prefer to create a new resource group for any newly created component in Azure, since it is easier to manage, maintain, and deploy these grouped resources later on for any modification to be made.
After that, you have to choose what operating system the function will be running on. The location represents which datacenter you want your function to be deployed on. Usually we choose the nearest datacenter to our physical location or to the clients’ physical location. The runtime stack is the technology of the function if it is either a .NET one, a JavaScript, or Java. The last one is the storage field where you also have to choose if it is a new storage account to be created or use an already existing one. The storage account is the one that holds up the Blob, Table storage and the Queues to be used by the created function.
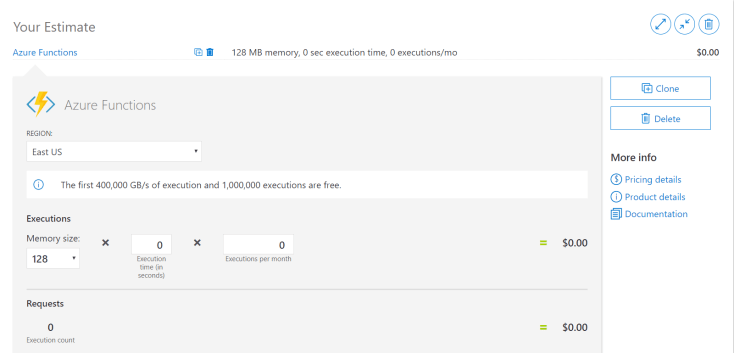
I save the Hosting Plan until the end since it needs some more explanation. The hosting plan field represents which plan rules the function will be subjected to while executing where the plan describes what type of hardware our function will be operating on. There are two available options, either an App Service Plan or a Consumption Plan. The difference is that if I choose an App Service Plan, this means that I will be always paying for that plan even if my function is inactive or not executing i.e. even if my function is not using any hardware resources. This option is more costly and you can check the costs of each plan by visiting the website provided by azure for calculating the fees or prices to be paid per service type (https://azure.microsoft.com/en-us/pricing/calculator/) as shown in the figure below.
The Consumption Plan is still like the App Service Plan, but in this scenario, you will not have to worry about the type of resources, virtual machines, and other things like scaling up or scaling down. All of these will be managed by Azure itself. So, choosing consumption plan as an option is like saying to azure do your work here and manage all these stuff for me so that I don’t have to worry about monitoring resources and check when I need to scale up or scale down to lower my cost. Finally, functions can be integrated with application insights, which give you the ability to monitor how your function is performing and where the errors are if there are any. After specifying all the required fields, the blade now will look somehow like the figure below.

When azure finishes creating the function, a notification will be displayed in the notifications center. After that we can navigate to the Function Apps blade form the left menu and we will find our newly created function there. The blade will look somehow like this:
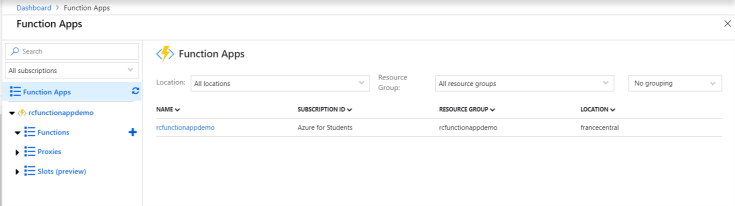
On the left hand side, we can see the available functions for each subscription. In my current subscription, I only have the function I created right now under the name “rcfunctionappdemo”. As we can see, in each function app we can have one or more functions. In order to create a new function in my function app, we navigate to the submenu Functions with the plus sign beside it. We also have the proxies and the slots, where slots are used for deployment slots (development, staging and production) while proxies are special type of functions that we use for executing between the client side and a backend service for example.
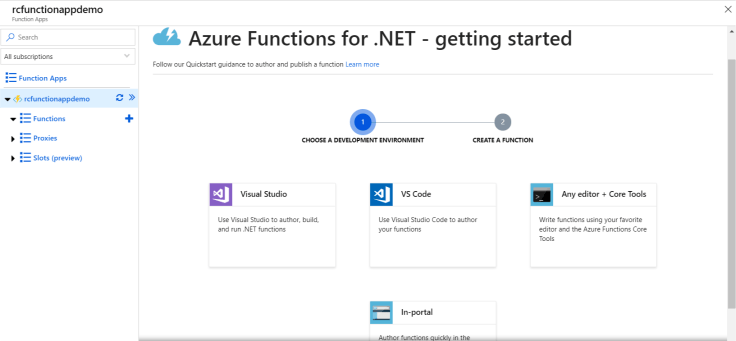
Now we click on the Functions node with the plus sign. This will open up a blade that displays the available functions in our function app. However, since we did not add any function yet, the displayed screen will be empty. Therefore, we click on the plus sign to add a new function, and here we go the blade that shows up will appear like below:
Since we want to use the portal for creating a new function in this section, we click on the “In-Portal” tab in order to proceed and then click continue. The next step will be as follows:
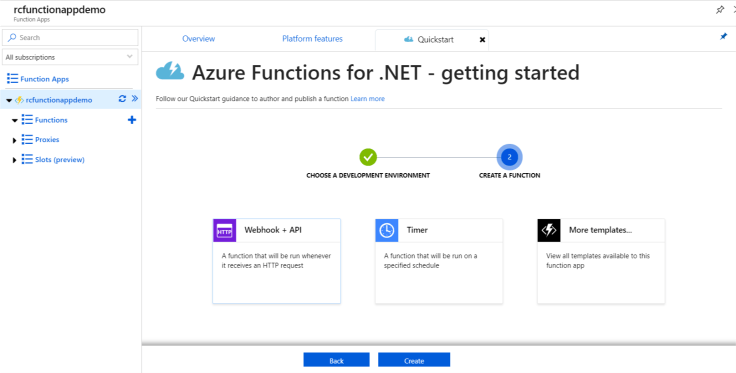
In this blade, the available templates displayed are the “Webhook+API” and the “Timer” templates. We can browse for more templates by clicking on the “More templates” tab, which leads us to the screen below:
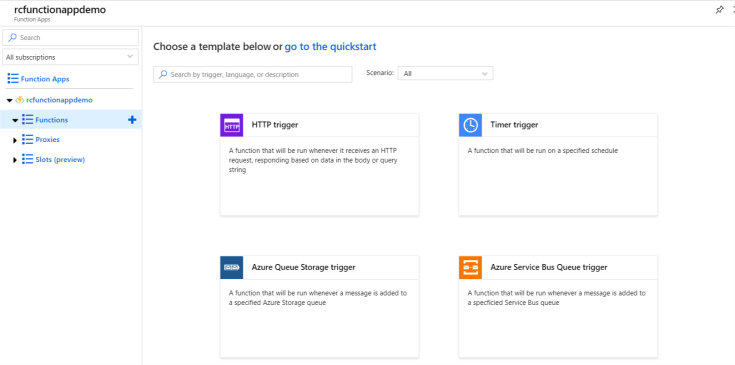
Each template type has a small description about its usage, for example we use the “HTTP trigger” when we want our function to execute whenever an HTTP request is received, while the “Timer trigger” is used when we want our function to execute at a specific predefined time like transferring data between two blobs at midnight. The function that we want to create will execute when an HTTP request is received, so we choose the “HTTP trigger” template. A new blade on the right opens up in order to specify the function name and the authorization level.
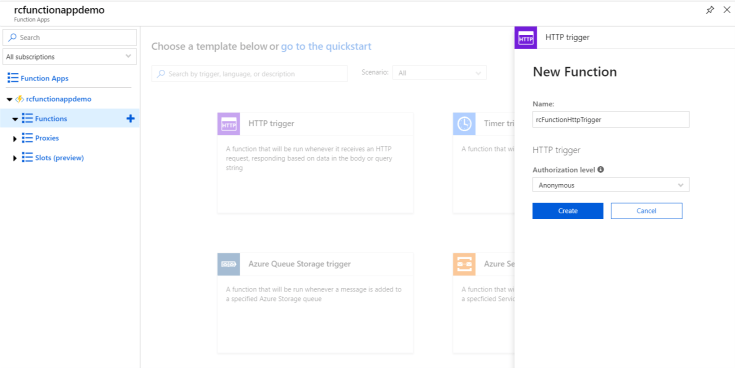
The authorization level decides the type of accessibility to the function that we’re creating. We have three options in this field either Anonymous, or Function, or Admin. The Anonymous type is used when we want to make our function accessible without any security or restrictions, while the Function type is used to make our function accessible through a generated key by azure, and finally the Admin is used when we have several nested functions within the same function app. For our function to be created we will choose the Function authorization type and then click create.
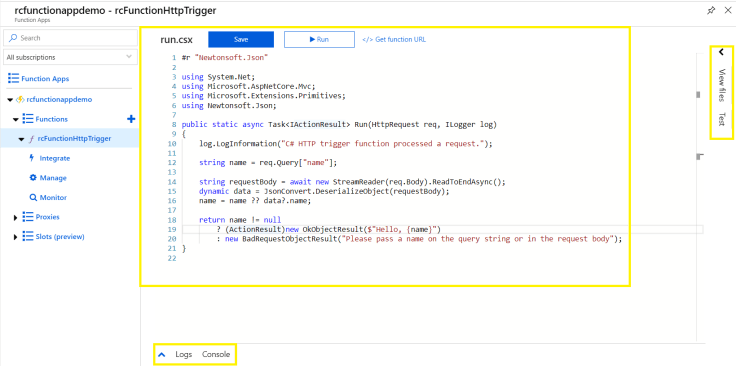
As we can see in the figure above, the screen contains several sections. In the middle, we have the editor, which we will be using for writing our code snippet that represents what the function will be mainly doing which implies that a function is really about writing a method block of code at the end. The section highlighted down below the editor contains the logs screen, which displays the errors when the code is compiled while the console acts like the normal console window that we all know which displays the folder path at the beginning. On the right side we can see the sections for testing our code function by doing a sample call for this function through an HTTP Post request, while the view files allows us to see the available files under this function block where the available file upon creation is the one opened in the editor and called “run.csx”.
So now, we have this C# function in our consumption plan, which takes HttpRequest and ILogger as parameters. The function is of type async since the call to this function is asynchronous and it is static as it does not depend on any object identity but belongs to the function type itself rather than to a specific object. The function will take the incoming Http request and the first thing that is being done is to log the message “C# HTTP trigger function processed a request” through the ILogger instance log. The next step is to fetch the query string parameter “name” from the incoming Http request where if this parameter is empty and no query string is sent via the function URL, then the function will be looking inside the request body as a JSON format and de-serialize it to fetch out the value. The last thing that the function does is to display the parameter value by creating a new response message through the OkObjectResult, which is of type ActionResult. If the name was empty, then a warning message is displayed to pass the parameter name value.
This was the default code generated when we created the function app. You can write your own code by modifying the function body written in C# based on what you need and want this function app to do from the incoming Http request call. We will keep the code as is and pass a value of “my first azure function app” in the name query string parameter and test what the function will display. To test the function we have two options, either by a direct call from the browser by using the function URL generated by Azure or in the Test tab at the right section of the screen described before.
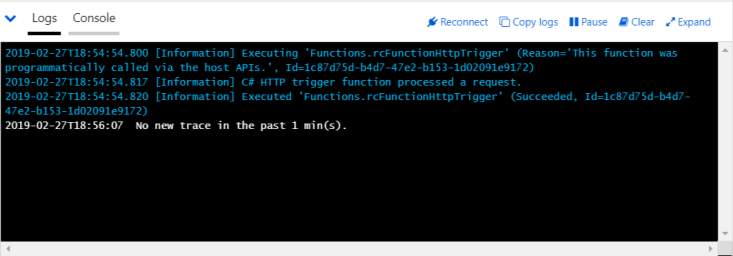
Before testing the function app, we want to make sure that we have no compilation or code errors. We check this by clicking save to commit our code function then click on the Run button. When we click on the Run button, the logs tab should indicate the compilation results and if any errors are, there you will be notified in this section. The logs tab should look somehow like below:
After running our code and checking that no compilation errors are there, we are going to test our function app. As a first option we can use the function URL generated by Azure to test the function app. To do so we click on the “Get Function URL” link. When clicked, a popup will be shown that contains the function URL as shown below.
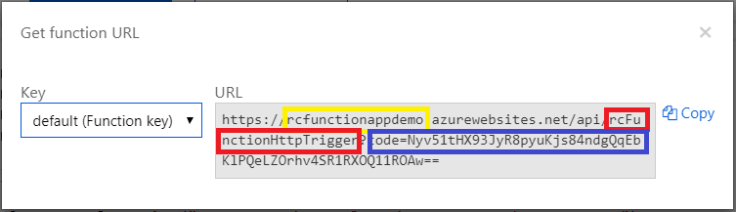
The function URL is formed up of your function app name highlighted above in yellow hosted by the azurewebsites.net and the function app acts like an API with the sub section function name highlighted in red. The final section is the code, which is a secured hash that enabled the access to the function app where without this code the generated response will be HTTP Status Code 401 unauthorized access. We take this URL and paste it in the browser and add the “name” query string value. The output will be as follows:

The second option as we mentioned is the Test tab. In this tab, we can test the function app by generating an Http Post call. The tab provides the ability to add query parameters, header and a request message body. Since we tested the query string option in the generated function URL, we will try now the request message body as shown below.
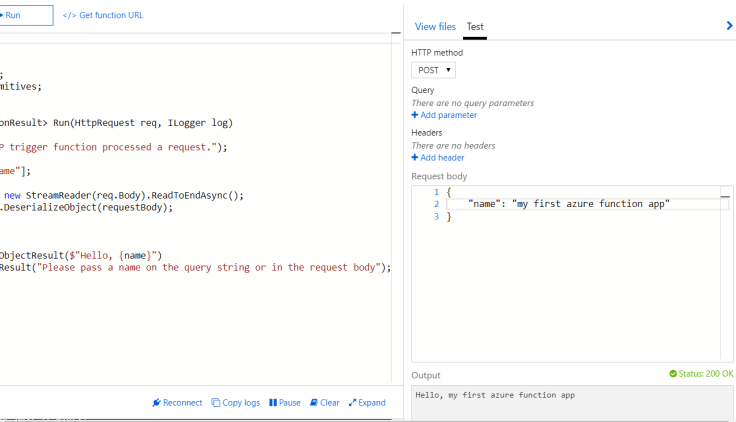
We provided the name variable in the request body and the type of the call is an Http Post. Once we click on run, the output generated will be the message “Hello, my first azure function app” with status 200 OK.
Creating a Function App in Visual Studio 2017
Now we come to create an azure function app by using Visual Studio 2017. You can also use VS Code and this will be discussed in another article.
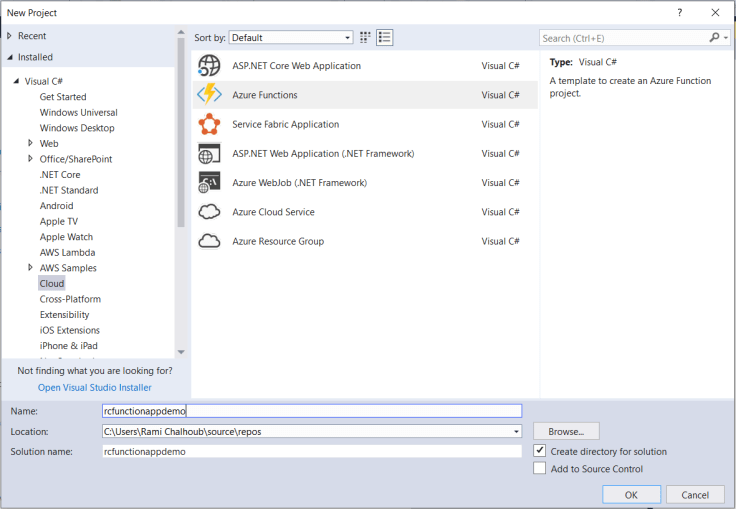
To create a function app in Visual Studio 2017 we choose new project and go to the section cloud where the function app template available. If you do not have this template installed, then you have to modify your visual studio installation and install the required templates for cloud projects. You specify the project name and path and after that click create. The process is shown below.
When you click Ok, another form will be shown to select the type of the azure function under which framework and other options. We have two options: either creating an azure function using .NET framework or creating an azure function using .NET Core. We will choose .NET Core option where also several types are displayed either an empty project app, or an Http Trigger app, etc… Since we want to have a function that takes an incoming Http Request, then we will choose the option Http Trigger project type as shown:
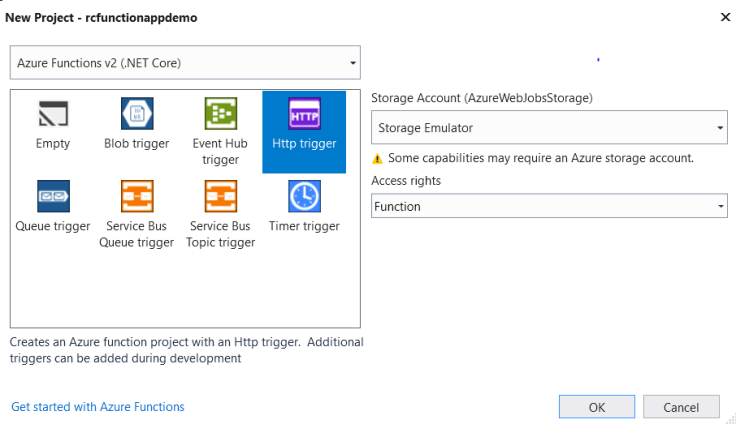
Notice that you can specify the storage account if you want any and the access rights or permission level for this function. In our sample function, we set the access right to “Anonymous”. By clicking Ok, the project will be created and it should looks like as below:
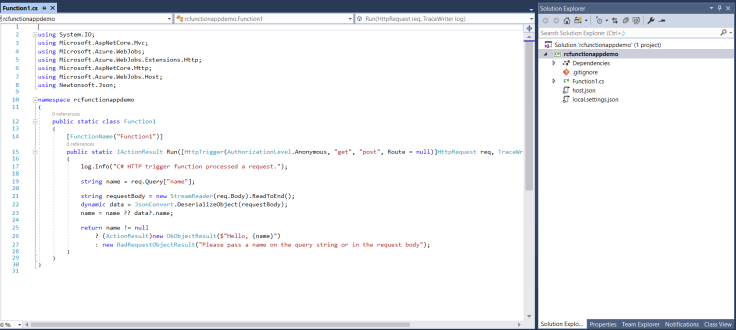
The project looks like a normal class library, which contains a class code file, called “Function1.cs” where this file will host our function. You can rename the class file; I chose the name “MyFirstAzureFunction.cs”. On the left tab, we can see that the code is very similar to the one we saw before in azure portal. You can change also the function name to any desired name you want. The method is a static one inside a static class. The method in this file should indicate to azure what this function does, what it takes as parameters and so on. These metadata can be expressed to azure using C# attributes. In this method, we can see the specified attribute is HttpTrigger with the authorization level that we chose at the project creation, which is Anonymous. In addition, it specifies what Http verbs it accepts, in our case, we have the GET and the POST without any specified Route since it is of a null value. The FunctionName attribute tells azure what is the public name of this function. Now, it is named as Function1 also so we will change it to the desired name to be displayed in public in azure. I will rename the function to be “MyHelloAzureFunction”. The body of the method is the same that we saw in the azure portal so no need to explain it again. Let us move forward in debugging the function locally and deploying it after that to azure.
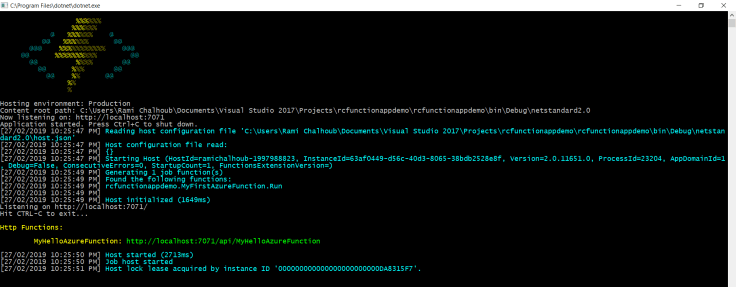
When we press F5 to run the project, it will take some time to execute in order to start the Microsoft Azure Emulator on your local machine. Once the project runs, it should display a console that looks similar to the above figure. Of course, you can set a breakpoint to debug the code of the function method once you create a call for this function. As we can see in the above figure, the function is hosted and running on localhost at the port 7071. Notice that the port on your local machine may differ and it depends on the available list of ports for the emulator to use, but 7071 is the default port used by the Azure Function Cli emulator. The function upon running the project can be reached through the URL displayed inside the console and in my case, it is as follow: http://localhost:7071/api/MyHelloAzureFunction.
So, let us now take the mentioned URL, paste it in the browser, and provide it with a query string “name” with any value you want. I will choose again the value used before which is “my first azure function app”. Once you provide the query string with the copied URL and hit enter in the browser, an Http Response will be generated containing the message “Hello, my first azure function app” as shown below:

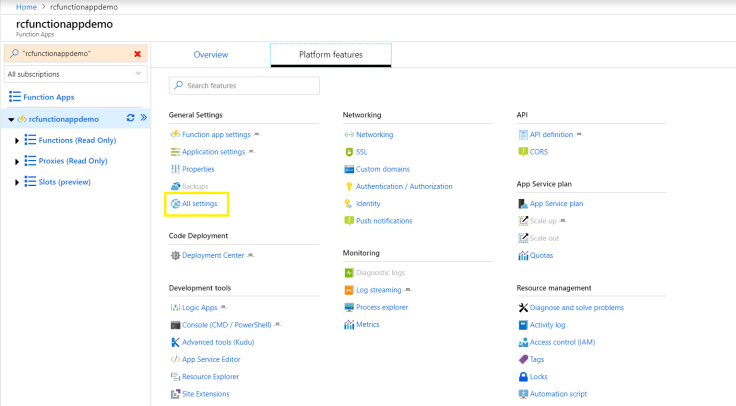
Now, after testing our function method locally, we come to deployment on azure. To deploy the function on azure, we have to check in our code to the repository of our function app on azure where the Kudu engine will handle the compilation and running of our code at the master branch of the repository. To do so we have to create the git repository if it is not there yet. We go to our function app; click on “All Settings” where a new blade will open that contains all the settings for this function app as shown below.
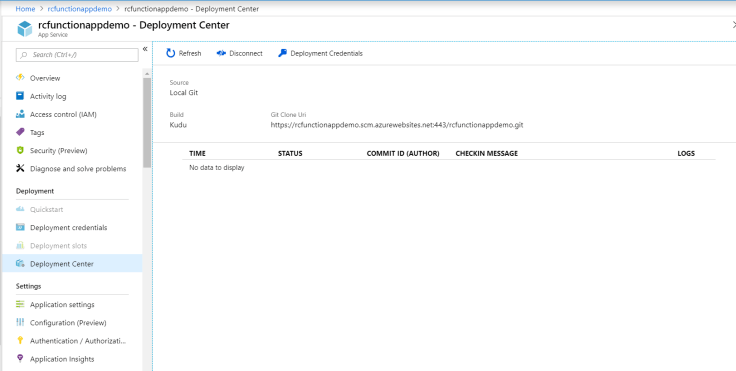
The git repo at my function app is already created before and ready for use by copying the Git URL. If it is the first time creating a git repo over the function app you created, you can easily go through the steps of creating it when you click on the “Deployment Center” section. Now that I have the git repo URL to commit my function app code to it from Visual Studio we have to start with adding our code to source control and choosing git repository by clicking on “Add to Source Control” button in the visual studio toolbar and choose “Git” from the list. After this step, visual studio will create the git file for the solution and now we are ready to start deploying. Open a console and navigate to the solution folder path, then use the git commands shown below with the git URL that we copied from the properties section of the function app at azure.
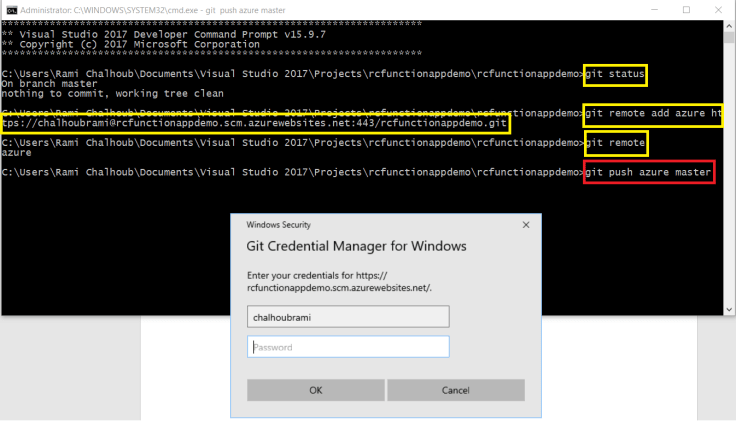
As you can see, we used several git commands to check the status of git repo at our solution, then pushed our code. When we execute the git push command a prompt for the credentials will be shown and you have to provide the password in order to start the process. If you still don’t have these credentials or doesn’t know anything about it, then you can go to the “Deployment Credentials” section under “All Settings” in the function app blade in azure and create your new username and password for this git repo.
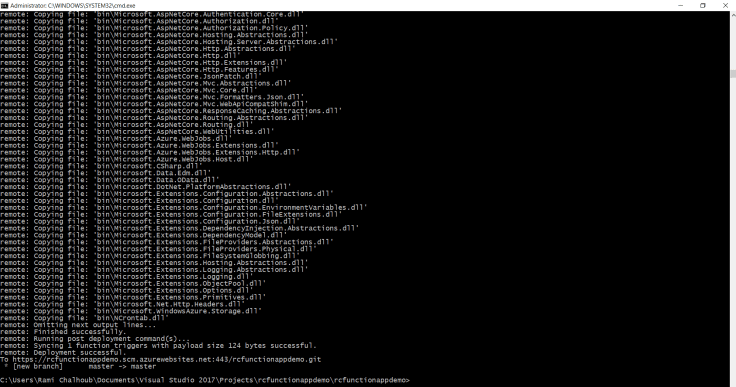
After providing the correct credentials, the upload process will start executing and as mentioned before the Kudu engine on azure will start compiling the pushed code. Later, the function will be ready at azure where this process may take some time to be done. Check below console status of my pushed code.
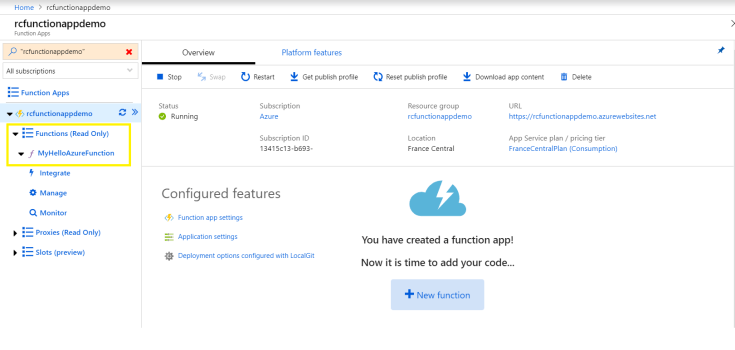
Once the push process is finished the code will be compiled and the function will be created under your function app in azure. If there is no compilation errors the function will be up and running once the push process and compilation by Kudu engine finishes. You can check this by going to your function app in azure and check the functions section under where it should now contain your uploaded function from visual studio as shown in the below figure in my case example.
Finally this it! You can test your function the same way mentioned before and for any changes, you want to apply on your function you have to repeat the process of pushing code to the same repo and master branch again so that the function can reflect the changes that were done on your code in visual studio. In the next article, we will see how to create an azure function using VS Code and much more. Stay tuned!
