Today, we are going to get started with setting up Docker v18.06.0-ce-win72 (19098) that now supports Kubernetes v1.10.3 on Windows machines running Windows 10 OS. We will end up by running an ASP.NET core app with Docker after creating a deployment, which manages up a Pod that runs the desired Container. This to be considered as a quick tutorial for getting started with Kubernetes where after that any developer can dig deep and learn more about using Kubernetes with Azure with what we call Azure Kubernetes Service AKS (or Azure Container Service).
What is Docker?
Docker by definition is an open platform for developers and sys-admins to build, ship, and run distributed applications, whether on laptops, data center VMs, or the cloud.
Docker is the biggest and most popular container system, so it is a way to containerize your application and put everything that your application needs into a small image that can run then on any computer that has Docker installed on it. It is a way to eliminate any obstacle in running your application over any platform due to configuration issues or missing libraries or any of the problems that we face when hosting an application. Therefore, any system that has Docker installed on it can containerize your application smoothly.
We have to differentiate between a container and a VM where the container is definitely not a virtual machine and what makes them different is shown in the below figure.
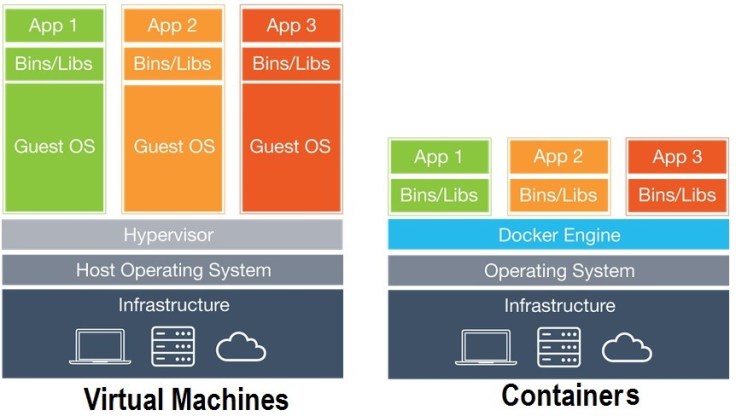
As we can see, in a VM you have to package up or setup a complete operating system where it is mandatory to have all the libraries required to run your application in order to host the app inside of it. While in Docker, you do not have an actual operating system to be installed and configured where Docker does all the translation needed (acts as a translation layer). Therefore, Docker simply runs a container on your operating system, which has all the bins and libraries needed, and the actual applications itself and the most interesting part is that Docker can share these libraries across multiple applications.
What is Kubernetes?
Kubernetes by definition is a portable, extensible open-source platform for managing containerized workloads and services, which facilitates both declarative configuration and automation. It has a large, rapidly growing ecosystem. Kubernetes services support and tools are widely available.
Simply Kubernetes is a container orchestrator, which takes a declared state of how you would like to configure your micro-services or your containers and makes it happen across computers. As an example, if you are running an application in the cloud like Azure over several compute instances where for each instance you will be configuring and cloning your application, build it and run it and if it crashes up you have to go back and figure out why it crashed out and reboot it again to be operating. Therefore, if you want all what mentioned in the previous statement to be done automatically for you without worrying about all these stuff; simply you can use Kubernetes where it handles all of these things for you. You setup Kubernetes on all of these instances where they communicate with each other through the master and give them a declared state that will make it happens and that is all!
Some terms to keep in mind when using Kubernetes are Node, Pod, Service, and Deployment. A Node is an instance of a computer running Kubernetes where a node runs what we call a Pod. The Pod is what contains one or more containers that are running. A Service is what handles the requests either coming from inside the Kubernetes cluster between several nodes, or a public request from outside the cluster to a master node that wants to execute a specific micro-service. The Service is usually referred as a load balancer. Deployment is what handles or defines the desired state of an app. The below figure shows how this architecture is.

Docker for Windows?
To install Docker for Windows, check the Install Docker for Windows for a detailed explanation about the installation steps and what needed to make Docker ready to be used on Windows 10. Once installed, you go to Docker settings to enable Kubernetes and show the system containers just as shown below.
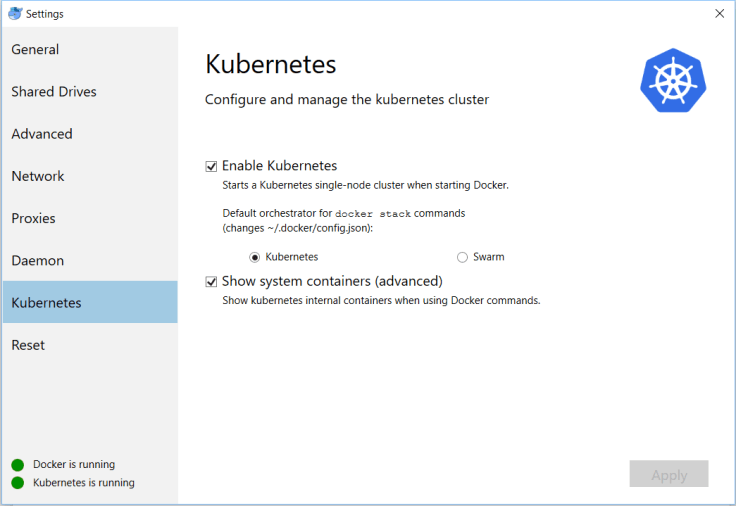
As you can see, there is also another framework that can be used instead of Kubernetes which is called Swarm but it is outside the scope of this article to be discussed.
Play around with some Commands
Once Docker installed on your machine, you can check it with the command line (or Windows PowerShell) by executing the command “docker” as follows:

You can check all your running Pods by executing the command “docker ps” and here are the running Pods on my machine.

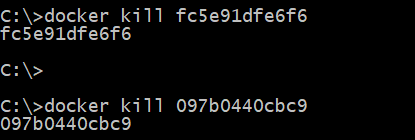
To terminate a certain Pod, all what you have to do is using the command “docker kill” and provide it with the Container ID to be terminated as shown below (to check if container was terminated use again the “docker ps”).
To run a new image on Docker we use the command “docker run appname”. If the application is not found, Docker will try to pull it out from library and give it a new GUID for the container id as follows.

I really like using commands in any platform, but UI is preferable for users to interact with any system and that is why Kubernetes offer a cool Web UI dashboard to interact with the clusters. Therefore, the Web UI is a visualization for what you saw above in the commands results where you can check the pods, nodes, services, and deployments you have in the system. Moreover, you have the ability to manage your system like scaling a Deployment, initiate a rolling update, restart a pod or deploy new applications using a deploy wizard and much more features that you can check online Web UI (Dashboard).
To enable the dashboard on your machine, all what you have to do is execute the below command.
kubectl apply -f https://raw.githubusercontent.com/kubernetes/dashboard/master/src/deploy/alternative/kubernetes-dashboard.yaml
You can add more extra features like charts and graphs by doing the following.
kubectl create -f https://raw.githubusercontent.com/kubernetes/heapster/master/deploy/kube-config/influxdb/influxdb.yamlkubectl create -f https://raw.githubusercontent.com/kubernetes/heapster/master/deploy/kube-config/influxdb/heapster.yamlkubectl create -f https://raw.githubusercontent.com/kubernetes/heapster/master/deploy/kube-config/influxdb/grafana.yaml
Where “kubectl” is a command line interface for running commands against Kubernetes clusters
Notice that the deployment file is of extension .yml where YAML is YAML is a human friendly data serialization standard for all programming languages. It is commonly used for configuration files, similar to JSON but the difference is that in YAML we use indentation instead of quotations. You can check more about YAML and download the library you want to work with via your preferred programming language.
To access the dashboard we use the “kubectl” command line tool and provide it with the keyword proxy as shown below.

Note that the dashboard can only be accessed from the machine that executes the above command. You can reach the dashboard via the following link:
Either the Kubernetes dashboard when opened will bring up the following screen where you can choose the grant access type via KubeConfig, Token, or you can skip this step and continue to the dashboard.

The dashboard will be something like what I have here on my system.

Now let us move into action by creating an ASP.NET Core Web Application in visual studio 2017 and create a Docker support for this app under Linux. I will use the visual studio templates for creating the application but of course, also commands can be used here to make the same setup.
The application I am creating is of name MyKubeASPNETCoreApp using ASP.NET Core 2.1 where I select the enable Docker support checkbox under the Linux OS:

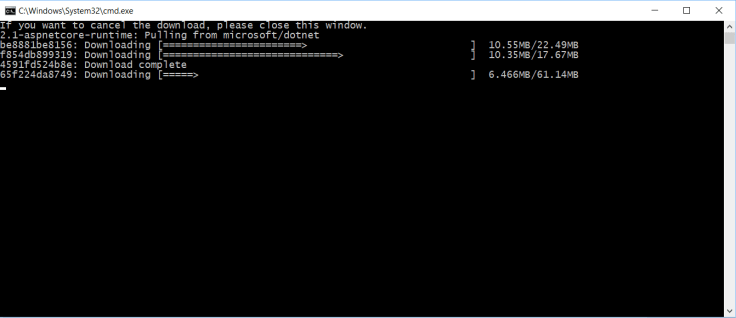
When clicking the Ok button the Docker setup will be activated and pulling of the images will be initiated as shown:

After the download finished pulling the images needed for Docker, my web app solution will now has a Docker file that contains the following:

When you hit run or F5 in Visual Studio 2017 and Docker is selected, the application will be configured to have a port running on it linked to port 80 over TCP connection. Watch out you may need to enable some Windows Firewall rules for Docker or the application will not run due to some port blocking or drivers sharing between windows OS and Docker. Now if I go and check in command line or PowerShell what are the running Pods I can see my application out there.

In the browser, I have the running demo app functioning smoothly!

I will share also the commands you can use to setup the app in Docker and Kubernetes instead of Visual Studio 2017 doing that for you.
C:\Users\Rami Chalhoub\Documents\Visual Studio 2017\Projects\MyKubeASPNETCoreApp>docker build -t mykubeaspnetcoreapp:dev
C:\Users\Rami Chalhoub\Documents\Visual Studio 2017\Projects\MyKubeASPNETCoreApp>kubectl run mykubeaspnetcoreapp –image= mykubeaspnetcoreapp:dev –port=80 deployment “mykubeaspnetcoreapp” created
As a start with Docker, and Kubernetes by running an ASP.NET Core Web application configured over Docker Linux OS we can see that we have a lot of features to play with and of course it will get much better in the future for building up containers and orchestrating them via Kubernetes !!

I precisely wanted to say thanks once more. I do not know what I would’ve gone through without the actual methods shared by you directly on such a area of interest. Certainly was the hard difficulty for me, however , discovering a specialized approach you dealt with it took me to leap for delight. Now i’m happy for this information and in addition have high hopes you recognize what a great job you are doing instructing the rest by way of your web blog. I am sure you have never met all of us.
I really treasure your work, Great post.